Difference between revisions of "Creating a New Macro"
| (3 intermediate revisions by 3 users not shown) | |||
| Line 1: | Line 1: | ||
| − | |||
:''See [[Macro Icon Properties]]'' | :''See [[Macro Icon Properties]]'' | ||
| − | Select the 'New' option from the 'Macro' | + | To create a new macro for a '''Flowchart''' or '''State Diagram''' |
| + | |||
| + | Select the 'New' option from the 'Macro' ribbon or press '''Ctrl+M''' to create a new macro. | ||
| + | |||
| + | You can also create a new macro using the 'Macros' section of the [[Project Explorer]] by clicking the arrow next to the 'Macro' item to open up a menu, then selecting 'Add new' from the menu. | ||
Your created macros will be displayed in a list in 'Macros' section of the Project Explorer, here you can add new local variables and constants as well as parameters if you did not do so earlier, you can also delete or edit existing local variables, constants and parameters. | Your created macros will be displayed in a list in 'Macros' section of the Project Explorer, here you can add new local variables and constants as well as parameters if you did not do so earlier, you can also delete or edit existing local variables, constants and parameters. | ||
| Line 12: | Line 15: | ||
__TOC__ | __TOC__ | ||
| + | |||
| + | |||
| + | |||
| + | |||
| + | |||
| + | |||
| + | |||
| + | |||
| + | |||
| + | |||
| + | |||
| + | |||
| + | |||
| + | |||
| + | |||
| + | |||
| + | |||
| Line 24: | Line 44: | ||
===Description=== | ===Description=== | ||
| − | Enter a description of the macro and its functions. | + | Enter a description of the macro and its functions. The description text will appear at the top of your macro flowchart above the Start icon. |
===Parameters=== | ===Parameters=== | ||
| − | Adds a list of parameters that are required to be supplied to the macro. | + | Adds a list of parameters that are required to be supplied to the macro. A parameter is an input to a macro and used to pass information to set the macro to do something specific. |
| + | |||
| + | These variables are local to the macro and so will be affixed with a . before the variable name. When you call a macro each parameter will need to have a valid macro. | ||
| + | |||
| + | Refer to component macros for examples of parameters in action. | ||
Set the Name and type of the parameters. | Set the Name and type of the parameters. | ||
| Line 38: | Line 62: | ||
===Variables=== | ===Variables=== | ||
| − | Adds a list of variables that are required to be used by the macro. | + | Adds a list of variables that are required to be used by the macro. These variables are local to the macro and so will be affixed with a . before the variable name. |
| + | |||
| + | These variables will only exist while you are inside the macro and so allows the overall RAM usage of your program to be lowered. | ||
| Line 48: | Line 74: | ||
===Return type=== | ===Return type=== | ||
| − | Specify the return type, or "No return variable" if the macro does not return a value. | + | Specify the return type, or "No return variable" if the macro does not return a value. The return variable is referenced in your macro by referring to the .Return local variable. |
===Private Flag=== | ===Private Flag=== | ||
| − | When creating a new macro for a component using the customized code feature you will be given a tick box allowing the macro to be private. If the macro is set to be private then the macro will not appear in the main Flowcode component macro list. This is useful for creating invisible helper functions such as the LCD RawSend function. | + | When creating a new macro for a component using the customized code feature you will be given a tick box allowing the macro to be private. |
| + | |||
| + | If the macro is set to be private then the macro will not appear in the main Flowcode component macro list. | ||
| + | |||
| + | This is useful for creating invisible helper functions such as the LCD RawSend function. | ||
==Video instructions== | ==Video instructions== | ||
See the [http://www.youtube.com/watch?v=5Z3zbVR7ZZY&list=PLQDWBb7bxuCgg6aJgPJcfXBMzZdLILceQ Adding Macros] video for information on creating a macro, the video shows the creation of a macro in a practical manner which covers the available functionality such as adding a parameter to the macro as well as creating a variable whilst also differentiating from global and local variables and constants. | See the [http://www.youtube.com/watch?v=5Z3zbVR7ZZY&list=PLQDWBb7bxuCgg6aJgPJcfXBMzZdLILceQ Adding Macros] video for information on creating a macro, the video shows the creation of a macro in a practical manner which covers the available functionality such as adding a parameter to the macro as well as creating a variable whilst also differentiating from global and local variables and constants. | ||
| − | |||
| − | |||
| − | |||
| − | |||
==Advanced Features== | ==Advanced Features== | ||
| − | |||
| − | |||
| − | |||
| − | |||
| − | |||
| − | |||
| − | |||
| − | |||
| − | |||
| − | |||
| − | |||
| − | |||
| − | |||
| − | |||
===Adding multiple parameters of the same type=== | ===Adding multiple parameters of the same type=== | ||
When adding parameters of certain types you can specify multiple variables at once by adding the names of the parameters with comma separated syntax. | When adding parameters of certain types you can specify multiple variables at once by adding the names of the parameters with comma separated syntax. | ||
| + | |||
| + | Variable names can be separated with or without spaces | ||
[[File:Macro_AdVar.jpg]] | [[File:Macro_AdVar.jpg]] | ||
Latest revision as of 11:08, 22 March 2023
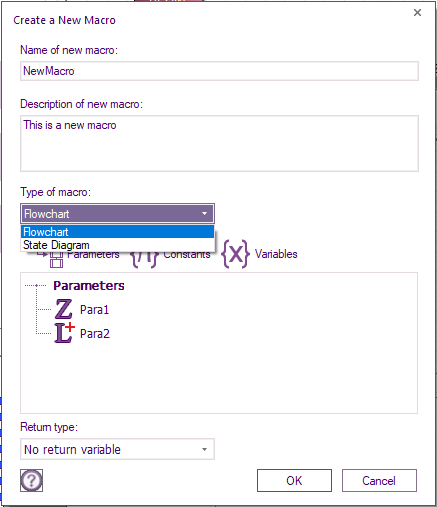
To create a new macro for a Flowchart or State Diagram
Select the 'New' option from the 'Macro' ribbon or press Ctrl+M to create a new macro.
You can also create a new macro using the 'Macros' section of the Project Explorer by clicking the arrow next to the 'Macro' item to open up a menu, then selecting 'Add new' from the menu.
Your created macros will be displayed in a list in 'Macros' section of the Project Explorer, here you can add new local variables and constants as well as parameters if you did not do so earlier, you can also delete or edit existing local variables, constants and parameters.
The Macro dialog will appear with the various options and information available to include:
Contents
Standard Features
Name
Enter a name for the macro. If the name that you enter for the new macro already exists, then Flowcode will prompt you for a different name.
Description
Enter a description of the macro and its functions. The description text will appear at the top of your macro flowchart above the Start icon.
Parameters
Adds a list of parameters that are required to be supplied to the macro. A parameter is an input to a macro and used to pass information to set the macro to do something specific.
These variables are local to the macro and so will be affixed with a . before the variable name. When you call a macro each parameter will need to have a valid macro.
Refer to component macros for examples of parameters in action.
Set the Name and type of the parameters.
Parameters can be added, edited or deleted.
Variables
Adds a list of variables that are required to be used by the macro. These variables are local to the macro and so will be affixed with a . before the variable name.
These variables will only exist while you are inside the macro and so allows the overall RAM usage of your program to be lowered.
Constants
Add, edit and delete constants which are only available to the selected macro.
Return type
Specify the return type, or "No return variable" if the macro does not return a value. The return variable is referenced in your macro by referring to the .Return local variable.
Private Flag
When creating a new macro for a component using the customized code feature you will be given a tick box allowing the macro to be private.
If the macro is set to be private then the macro will not appear in the main Flowcode component macro list.
This is useful for creating invisible helper functions such as the LCD RawSend function.
Video instructions
See the Adding Macros video for information on creating a macro, the video shows the creation of a macro in a practical manner which covers the available functionality such as adding a parameter to the macro as well as creating a variable whilst also differentiating from global and local variables and constants.
Advanced Features
Adding multiple parameters of the same type
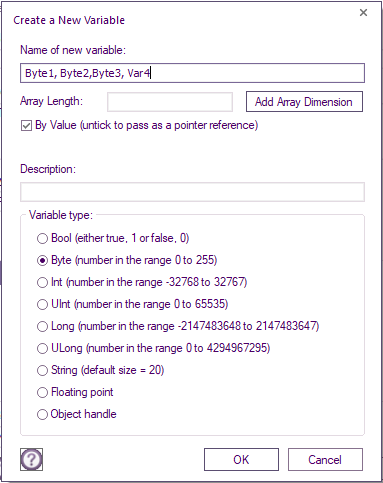
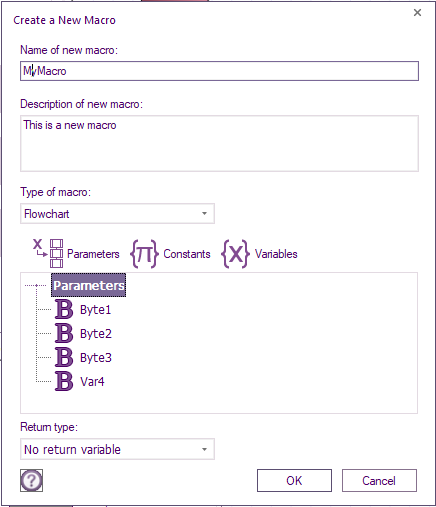
When adding parameters of certain types you can specify multiple variables at once by adding the names of the parameters with comma separated syntax.
Variable names can be separated with or without spaces
Pressing OK will allow the parameters to be automatically generated.
This syntax also works when creating local and global variables.


