Difference between revisions of "Using the Project Explorer"
(→Macros) |
|||
| Line 63: | Line 63: | ||
==Macros== | ==Macros== | ||
| − | Displayed is a list of all the [[Creating a New Macro|macros]] in the current project, each macro can be expanded and the specific parameters, constants and variables associated with that macro are shown. | + | Displayed is a list of all the [[Creating a New Macro|user macros]] in the current project, each macro can be expanded and the specific parameters, constants and variables associated with that macro are shown. |
You can navigate straight to the specific macros, showing them as flowcharts or as source as well as adding, deleting and editing any parameters, constants or variables associated with each macro. | You can navigate straight to the specific macros, showing them as flowcharts or as source as well as adding, deleting and editing any parameters, constants or variables associated with each macro. | ||
Macros in the Project Explorer can be dragged and dropped into the main flowchart. | Macros in the Project Explorer can be dragged and dropped into the main flowchart. | ||
| − | |||
==Components== | ==Components== | ||
Revision as of 14:36, 9 March 2023
Contents
Introduction
The Project Explorer allows the user to quickly and easily manage their program by giving an overview of the current project. Macros and Variables can easily be added, edited or deleted.
Which tabs appear and in what order can be selected via Global settings>UI Trees
Icons and Macros can be dragged into the project code window.
Icons
Lists the programming icons allowing you to drag new code icons onto your project.
Ports
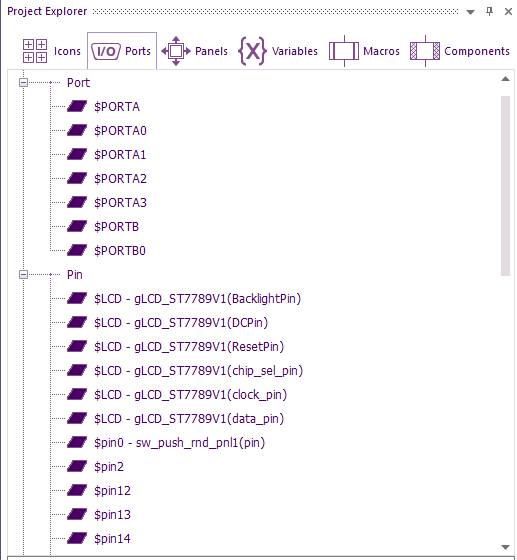
The Project Explorer shows the available ports for the currently selected device.
You can directly reference these ports in calculations or other expressions and connect components to these ports, by right-clicking the port or clicking on the arrow next to the port name you can select 'List occurrences' which will use the Icon lists pane to show where the ports are being used and referenced.
You will also be able to see all the pins that have components connected to them.
Panels
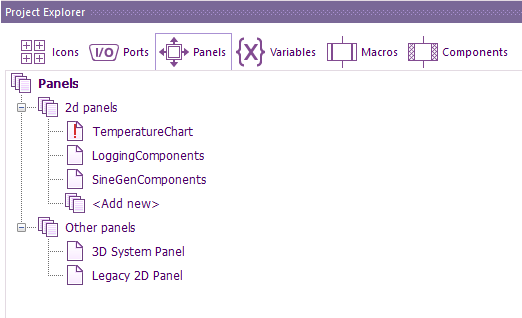
Since you can have multiple 2d panels open, this tab will show all the panels that have been added.
There is an option to add more panels if required.
Each panel can be right-clicked on to rename, change the colour, gridlines, etc by selecting properties.
The red exclamation mark is warning you the panel has been closed.
To open the panel, either right-click on the panel name and select show, or double-click on the panel name.
Variables
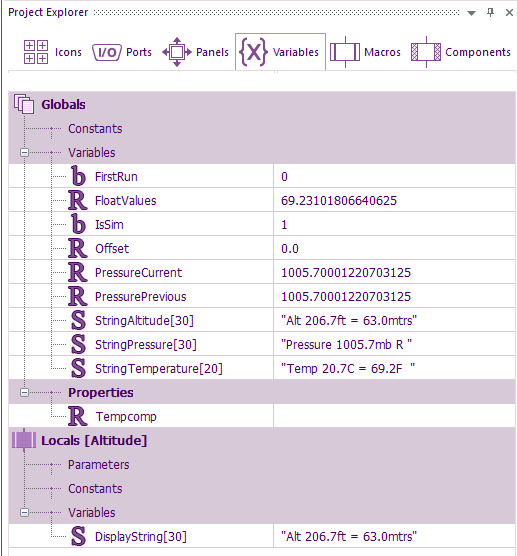
This section shows all the global constants and variables used in the project.
Globals are visible to any macro in the project.
You can add, edit and delete both global constants and variables from this section.
You can also use the 'List occurrences' option previously mentioned to list where these variables are being used.
If the speed of the simulation is changed to Fast (with updates) via the Simulation debugger, (for this you will need to have the simulation paused) or via Project_Options Then when the simulation is running all the global and local variables (only if within the appropriate call macro) values will be shown.
If the simulator is paused then the variable's values can be changed by left-clicking the variable's current values.
As well as global variables, local variables present within the Macro which you currently have selected, if you change the currently selected macro by clicking on another Macro tab in the main flowchart window, this Project Manager tab will update to show you the new local variables associated with the newly selected Macro.
Macros
Displayed is a list of all the user macros in the current project, each macro can be expanded and the specific parameters, constants and variables associated with that macro are shown.
You can navigate straight to the specific macros, showing them as flowcharts or as source as well as adding, deleting and editing any parameters, constants or variables associated with each macro.
Macros in the Project Explorer can be dragged and dropped into the main flowchart.
Components
This section contains list of all the components used in the current project, you will be able to edit the properties, connections and custom code of each individual component. Components in the Project Explorer can be dragged and dropped into the main flowchart.
Events
Finally, the last section allows you to create event macros with ease, it lists all of the available events and shows which event macros you have created, you can use this menu to navigate your existing event macros as well as creating new ones, it also allows you to delete your existing event macros or show them in your flowchart.
Video instructions
View the Introducing the Project Explorer video to learn more about the Project Explorer, including the basic fundamentals as well as the capabilities of each section, the video highlights how to use the Project Explorer panel effectively.


