Exercise - Building a Complex Component: Difference between revisions
JohnVerrill (talk | contribs) No edit summary |
No edit summary |
||
| (33 intermediate revisions by 3 users not shown) | |||
| Line 1: | Line 1: | ||
<sidebar>Sidebar: Flowcode Exercises:Ex3</sidebar> | |||
This exercise shows how to create a traffic cone with a double flashing lamp, using the 'newLED' component. | This exercise shows how to create a traffic cone with a double flashing lamp, using the 'newLED' component. | ||
The settings and dimensions given are found by trial-and-error, or by using the cursor and cursor position settings shown at the bottom of the [[System Panel]]. | |||
==Setting up the LED component== | |||
* Open a new Flowcode flowchart. | * [[Creating Flowcharts|Open a new Flowcode flowchart]]. | ||
* Ensure that the [[System Panel]] is visible. If not use the [[View]] menu. | * Ensure that the [[System Panel]] is visible. If not use the [[View]] menu. | ||
* The following assumes that you have built, and exported a LED component, as described in [[Exercise - Create | * The following assumes that you have built, and exported a LED component, as described in [[Exercise - Create an LED Component]] and [[Exercise - Exporting the LED Component]]. | ||
[[File:gen_exerciseBuildComplexComp_complex1.png|180px|right]] | [[File:gen_exerciseBuildComplexComp_complex1.png|180px|right]] | ||
* Open the 'Outputs' toolbox, where you stored the exported 'newLED' component. | * Open the 'Outputs' toolbox, where you stored the exported 'newLED' component. | ||
| Line 18: | Line 20: | ||
* Using the Panel Properties, with the LED still selected, set its 'Position' to X=0, Y=0, Z=10, and its 'Scale' to 'Wi...'=1, 'He...'=1, 'De...'=0.25. | * Using the Panel Properties, with the LED still selected, set its 'Position' to X=0, Y=0, Z=10, and its 'Scale' to 'Wi...'=1, 'He...'=1, 'De...'=0.25. | ||
: The component should resemble the picture opposite, (depending on the 'camera' zoom.) | : The component should resemble the picture opposite, (depending on the 'camera' zoom.) | ||
| Line 27: | Line 26: | ||
==Adding the second LED== | |||
[[File:gen_exerciseBuildComplexComp_complex2_01.png|180px|right]] | |||
* Click on the head of the vertical arrow, (green), to rotate the camera to give an 'edge-on' view. | * Click on the head of the vertical arrow, (green), to rotate the camera to give an 'edge-on' view. | ||
| Line 34: | Line 35: | ||
* Set its 'Position' co-ordinates to X=0, Y=0, Z=-10, and the 'Rotation' settings to X=0, Y=180, Z=0. | * Set its 'Position' co-ordinates to X=0, Y=0, Z=-10, and the 'Rotation' settings to X=0, Y=180, Z=0. | ||
: The System panel should now resemble the one shown opposite: | : The System panel should now resemble the one shown opposite: | ||
| Line 41: | Line 41: | ||
==Mounting the LEDs== | |||
[[File:gen_exerciseBuildComplexComp_complex3_01.png|180px|right]] | |||
* Drag and drop a cube onto the System Panel. | * Drag and drop a cube onto the System Panel. | ||
| Line 47: | Line 49: | ||
* Change its 'color' property to mid-grey (e.g. 0x5A5A5A). | * Change its 'color' property to mid-grey (e.g. 0x5A5A5A). | ||
: The System Panel looks like: | : The System Panel looks like the one opposite: | ||
| Line 54: | Line 56: | ||
* Drag across all three shapes and group them by clicking on the 'Group' icon.[[File: | |||
==Building the traffic cone== | |||
* Drag across all three shapes and group them by clicking on the 'Group' icon.[[File:Gen_Panel_Object_Group_01.png|border]] | |||
* Notice that the 'Component Handle' and 'Type' have changed to 'Group'. Rename the 'Handle' as "flasher". | * Notice that the 'Component Handle' and 'Type' have changed to 'Group'. Rename the 'Handle' as "flasher". | ||
| Line 61: | Line 66: | ||
* Drag and drop a cone onto System Panel. | * Drag and drop a cone onto System Panel. | ||
* Select it, and set its 'Position' co-ordinates to X=0, Y=- | * Select it, and set its 'Position' co-ordinates to X=0, Y=-12, Z=0, 'Scale' to 'Wi...'=45, 'He...'=45, 'De...'=120 and 'Rotation' to X=-90, Y=0, Z=0. | ||
* Change its 'color' to red (e.g. 0x0000C0). | * Change its 'color' to red (e.g. 0x0000C0). | ||
* View it from different 'camera' directions by clicking on the heads of the red, green and blue arrows. It should resemble the picture shown below: | * View it from different 'camera' directions by clicking on the heads of the red, green and blue arrows. It should resemble the picture shown below: | ||
<gallery widths=180px perrow=3 caption="Three views"> | <gallery widths=180px perrow=3 caption="Three views"> | ||
File:gen_exerciseBuildComplexComp_complex4_01.png | File:gen_exerciseBuildComplexComp_complex4_01.png | ||
| Line 71: | Line 78: | ||
File:gen_exerciseBuildComplexComp_complex6_01.png | File:gen_exerciseBuildComplexComp_complex6_01.png | ||
</gallery> | </gallery> | ||
* Revert to the original (left-hand side) view. | |||
* Drag and drop a cylinder onto the System Panel. | |||
* Give it the following settings: | |||
:: 'Position' - X=0, Y=-75, Z=0; | |||
:: 'Scale' -'Wi...'=60, 'He...'=60, 'De...'=10; | |||
:: 'Rotation' - X=-90, Y=0, Z=0. | |||
* Change its 'color' to dark red (e.g. 0x000080). | |||
==The completed traffic cone== | |||
* Drag across all three shapes and group them by clicking on the 'Group' icon. | |||
:: The System Panel now looks like this: | |||
[[File:gen_exerciseBuilbComplexComp_complex7_01.png|center|180px]] | |||
==Adding an interface== | |||
The next task is to make the cone do something - flash on and off. | |||
* Click on 'Macro' and then 'New' to create a new macro. | |||
* In the 'Create a New Macro dialogue box, name the new macro "flash" and click on 'OK'. | |||
* On the 'flash' macro workspace: | |||
:* add an infinite loop, and inside the loop: | |||
::* drag and drop a 'Simulation macro' icon; | |||
:::* double click on it. Rename it "Switch on". Click on the 'Simulation' tab, and on one of the 'LEDon' labels and click on 'OK'. | |||
::* drag and drop a 'Delay' icon. | |||
:::* double click on it. Change its name to "One second delay". Change the units to 'seconds' and click on 'OK'. | |||
::* drag and drop a second 'Simulation macro' icon; | |||
:::* double click on it. Rename it "Switch off". Click on the 'Simulation' tab, and on one of the 'LEDoff' labels and click on 'OK'. | |||
::* drag and drop a second 'Delay' icon, and configure it exactly as before. | |||
<br /> | |||
The 'flash' flowchart now resembles the one shown below: | |||
[[File:Gen exercisetest LEDimport testflowchart.png|200px|center]][[File:gen_exerciseBuildComplexComp_flashmacro_01.png|250px|right]] | |||
<br /> | |||
<br /> | |||
<br /> | |||
* In the 'Main' part of the flowchart, drag and drop a 'Macro' icon. | |||
:* Double click on it and then click on the 'flash' label. | |||
* Test the component by simulating the program. | |||
:* See the [[Exercise - Simulating a Program]] | |||
<br /> <br /> <br /> <br /> <br /> <br /> | |||
==What next?== | |||
* The traffic cone component can now be exported in the usual way, see [[Exercise - Exporting the Traffic Cone Component|Exporting the Traffic Cone]]. | |||
Latest revision as of 14:46, 13 March 2014
<sidebar>Sidebar: Flowcode Exercises:Ex3</sidebar> This exercise shows how to create a traffic cone with a double flashing lamp, using the 'newLED' component. The settings and dimensions given are found by trial-and-error, or by using the cursor and cursor position settings shown at the bottom of the System Panel.
Setting up the LED component
- Ensure that the System Panel is visible. If not use the View menu.
- The following assumes that you have built, and exported a LED component, as described in Exercise - Create an LED Component and Exercise - Exporting the LED Component.

- Open the 'Outputs' toolbox, where you stored the exported 'newLED' component.
- Locate the 'newLED' component, and use the down-arrow next to it to add it to the System Panel.
- Click on the LED to select it. Change the 'color' property to orange (e.g. 0x0080FF).
- Using the Panel Properties, with the LED still selected, set its 'Position' to X=0, Y=0, Z=10, and its 'Scale' to 'Wi...'=1, 'He...'=1, 'De...'=0.25.
- The component should resemble the picture opposite, (depending on the 'camera' zoom.)
Adding the second LED

- Click on the head of the vertical arrow, (green), to rotate the camera to give an 'edge-on' view.
- The LED should still be selected. If not, click on it. Right-click and select the 'Copy' option. Then right-click and select the 'Paste' option.
- A second identical LED appears.
- Set its 'Position' co-ordinates to X=0, Y=0, Z=-10, and the 'Rotation' settings to X=0, Y=180, Z=0.
- The System panel should now resemble the one shown opposite:
Mounting the LEDs

- Drag and drop a cube onto the System Panel.
- Select it, and set its 'Position' co-ordinates to X=0, Y=0, Z=0, and 'Scale' to 'Wi...'=32, 'He...'=12, 'De...'=32.
- Change its 'color' property to mid-grey (e.g. 0x5A5A5A).
- The System Panel looks like the one opposite:
Building the traffic cone
- Drag across all three shapes and group them by clicking on the 'Group' icon.

- Notice that the 'Component Handle' and 'Type' have changed to 'Group'. Rename the 'Handle' as "flasher".

- Click on the head of the vertical arrow, (blue), to rotate the camera back to the 'head-on' view.
- Drag and drop a cone onto System Panel.
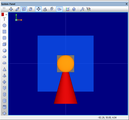
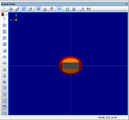
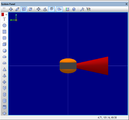
- Select it, and set its 'Position' co-ordinates to X=0, Y=-12, Z=0, 'Scale' to 'Wi...'=45, 'He...'=45, 'De...'=120 and 'Rotation' to X=-90, Y=0, Z=0.
- Change its 'color' to red (e.g. 0x0000C0).
- View it from different 'camera' directions by clicking on the heads of the red, green and blue arrows. It should resemble the picture shown below:
- Three views
-
-
-


- Revert to the original (left-hand side) view.
- Drag and drop a cylinder onto the System Panel.
- Give it the following settings:
- 'Position' - X=0, Y=-75, Z=0;
- 'Scale' -'Wi...'=60, 'He...'=60, 'De...'=10;
- 'Rotation' - X=-90, Y=0, Z=0.
- Change its 'color' to dark red (e.g. 0x000080).
The completed traffic cone
- Drag across all three shapes and group them by clicking on the 'Group' icon.
- The System Panel now looks like this:

Adding an interface
The next task is to make the cone do something - flash on and off.
- Click on 'Macro' and then 'New' to create a new macro.
- In the 'Create a New Macro dialogue box, name the new macro "flash" and click on 'OK'.
- On the 'flash' macro workspace:
- add an infinite loop, and inside the loop:
- drag and drop a 'Simulation macro' icon;
- double click on it. Rename it "Switch on". Click on the 'Simulation' tab, and on one of the 'LEDon' labels and click on 'OK'.
- drag and drop a 'Delay' icon.
- double click on it. Change its name to "One second delay". Change the units to 'seconds' and click on 'OK'.
- drag and drop a second 'Simulation macro' icon;
- double click on it. Rename it "Switch off". Click on the 'Simulation' tab, and on one of the 'LEDoff' labels and click on 'OK'.
- drag and drop a second 'Delay' icon, and configure it exactly as before.
The 'flash' flowchart now resembles the one shown below:


- In the 'Main' part of the flowchart, drag and drop a 'Macro' icon.
- Double click on it and then click on the 'flash' label.
- Test the component by simulating the program.
- See the Exercise - Simulating a Program
What next?
- The traffic cone component can now be exported in the usual way, see Exporting the Traffic Cone.